Buy Floor Paint Home
Buy Floor Paint About Us
Acrylic Resin
Floor Paint Water Based Epoxy Resin Floor Paint Solvent Based Epoxy
Resin Floor Paint Solvent Free Epoxy Resin Floor Paint Polyurethane Resin
Floor Paint
Floor Paint Water Based Epoxy Resin Floor Paint Solvent Based Epoxy
Resin Floor Paint Solvent Free Epoxy Resin Floor Paint Polyurethane Resin
Floor Paint
Selection Guide for Floor Paints
Floor Paint Colour
Selection Charts Surface Preparation
for Floor Painting Garage Floor Paint Industrial Floor Paints Non Slip Floor Paint Wall Coatings Contact
Buy Floor Paints
Selection Charts Surface Preparation
for Floor Painting Garage Floor Paint Industrial Floor Paints Non Slip Floor Paint Wall Coatings Contact
Buy Floor Paints
For FREE Expert Advice or Assistance Call Any of Our Offices and Our Floor Painting Specialists will be Pleased to Help.
Scotland: 01786 472800
Chorley: 01257 266696
Scotland: 01786 472800
Chorley: 01257 266696
Concrete Floor Surface Preparation & Cleaning Guide
“Do I need to prepare the floor before applying Floor Paint?” - This is one of the areas that we get most questions about at Buy Floor Paint. Therefore we have produced this short guide to concrete floor surface cleaning and surface preparation to assist our clients and customers in making the right decisions and successfully completing their floor painting projects.
However, if any aspect of the required surface cleaning or surface preparation is not clear for you on your floor painting project, then please call any of our offices and one of our floor paint specialists will be happy to assist you.
However, if any aspect of the required surface cleaning or surface preparation is not clear for you on your floor painting project, then please call any of our offices and one of our floor paint specialists will be happy to assist you.
1. Floor Cleaning & Surface Preparation for Painting – An Overview
Generally floor cleaning and surface preparation, prior to applying any floor paint, is a matter of Common Sense – provided that you understand the nature of the floor painting materials, the concrete floor or cement screed substrate and its existing surface condition, together with your new painted floor's future-in terms of it’s performance and durability requirements.
So - “Do I need to prepare the floor before applying Floor Paint?” - This is actually almost exactly the same question as “Should I rub down and prepare my enamelled steel radiators, my wooden doors or window frames (etc.) before I paint them”– Except that you do not normally also walk or drive over these surfaces, and so their paint bonding and performance requirements are always much less than those of a floor!
– And yet no one with any common sense would even consider not cleaning and preparing all of these other surfaces before painting them! – Additionally as an example - Newly plastered or rendered walls do not normally need any extra cleaning or surface preparation, other than full drying out and cleaning and dust or dirt from the surface, before painting them, usually with water based emulsion paints. – This is because these wall surface are porous and at least some of the paint penetrates into the wall, provided they have been given time to dry out sufficiently (if it doesn’t you will see the paint peel off your plaster – a dead giveaway to plaster that has been painted to soon and before it had dried out sufficiently – So now you know – Surface preparation is basically common sense!. - Plus most importantly - We do not even walk, or drive cars and forklifts on these surfaces!
Floor surface preparation requirements can therefore be considered in such a logical way as well: For concrete floors and cement screeds – If you are going to expose your painted floor to frequent foot traffic, and / or any kind of wheeled vehicle traffic, then it makes sense to carry out some form of surface cleaning and preparation to ensure that your new floor paint will adequately penetrate and / or bond (stick) to the sound concrete and not just to a layer of dirt or dust on its surface.
So the floor cleaning and surface preparation should be carried out – according to the floors existing condition, the specific future floors exposure and the type of floor paint you are going to use? Even a simple water based epoxy resin floor paint is £65 – 70 for 5 litres, so the absolute minimum to consider giving yourself a chance of success, is to make sure the concrete or cement screed floor area is clean and dry plus to brush the surface thoroughly with a stiff bristle or wire brush, to ensure you remove any visible dirt or dust and any loose particles. Finally always vacuum the surfaces thoroughly immediately before applying the floor paint.
For the application of floor paint in more demanding areas or for high performance where the floor will be subject to frequent traffic, fork lift trucking, possible chemical spillages and where long term durability is required, it is logical that a full evaluation of the best and most suitable cleaning and / or additional surface preparation requirements is made - Common sense.
This is the same for any floor paint that you want to last in these situations, including our water based epoxy resin floor paints and the highest performance solvent free epoxy resin based floor paints, which cost up to £150 for 5 litres, so it makes sense to do or get the job done ‘Right First Time’.
- Any dirt, dust or other loose / friable materials must be removed.
- Any surface contaminants such as oils, grease and anyr other past spillages or old floor polish residues etc. must be removed.
- On new fully hardened concrete and cement screed surfaces any curing agent residues or any cement laitance must be removed (see New Concrete and Cement Screed Floors below).
- The concrete or cement screed substrates must be sufficiently thick, sound and strong enough to meet your service requirements. As an example - industrial floors in factories, warehouses and commercial facilities are recommended to have a compressive strength of at least 25Mpa and a pull off strength of at least 1.5Mpa – This is not normally a problem for new floors – (See New Concrete and Screed Floors section below). But existing floor strength should always be checked – See ‘Floor Substrate Testing’ below.
- Any existing de-bonded, loose or flaking floor paints must be removed (some firmly adhering, sound existing floor paints can be overcoated, but only with an appropriate type of floor paint product – So this depends on the type of existing materials and your future floor paint performance requirements.
i.e.
- By following these relatively simple rules above for floor cleaning and surface preparation on concrete floors and cement floor screeds, you will be assured of a successful floor painting job.
More information and details on exactly how to do this assessment and preparation are given in each of the sections below – But if you have any concerns or additional questions, please do not hesitate to call any of our offices and one of our floor painting specialists will be happy to assist you with your specific project requirements.
Curing, Hardening & Drying-out for Floor Painting:
This means that a concrete floor slab must always be a minimum of 28 days old before any floor painting work is carried out – And this is always provided they are indoors, protected and not exposed to rainfall, or water run-off etc.
For larger areas and thicker concrete floor slabs, as used for the normal medium to heavy duty service requirements, in most institutional, retail, commercial and industrial premises, the concrete can actually take much longer to dry out. – For example a new 200mm thick ground floor concrete slab laid over a DPM without any additional heating or ventilation, can take up to a full year to dry out to a moisture content of 4% by volume – which is the maximum recommended for the application of any vapour tight resin floor paint.
However, there are now floor systems, such as our range of water based epoxy floor paints that are suitable for earlier application. This is because whilst they are waterproof, they are also vapour permeable, meaning that the concrete can continue to dry out under the freshly applied fully bonded floor paint.
- If you think that you may have an excessive moisture content that could cause a problem, then we recommend that you carry out the ‘Moisture Mat’ test in the ‘Floor Substrate Testing’ section below and then again follow the recommendations according to your test results.
Additionally, if your project does require the use of a vapour-tight, solvent free epoxy floor paint in order to meet your heavy duty exposure or other special performance requirements, then it is still possible to do the work successfully, by using one or more of the following solutions before applying the selected solvent free epoxy floor paint product:-
- Using additional drying equipment. - Using special water reducing admixtures in the concrete. - Using a special moisture barrier system from us (such as Sika EpoCem technology).
Obviously all of these have different time/cost and technical implications dependant on the project, so in these instances we recommend that you speak to one of the flooring specialists in any of our offices, who will be pleased to assist you in identifying the fastest and most cost effective solution for your floor painting project.
Surface Finishing & Cement Laitance Limitations for Floor Painting:
For successful floor painting it is essential to ensure that the surface has not been ‘over-finished’, which can make the surface very dense and impermeable, but also create a weak and friable layer. – This weak but brittle surface layer is known as ‘cement laitance’, and it’s presence means that floor paint will not penetrate into the concrete, however it will probably bond and ‘stick’ very well to this cement laitance layer – the whole of this weak surface layer will eventually de-bond and come off, bringing with it your newly applied floor paint! How soon this will happen is dependent on the floors exposure to traffic and variations in temperature etc. – The more frequent these are, then the faster the cement laitance layer will de-bond and your new floor will ‘fail’.
- If you think that you have a cement laitance problem on your new concrete floor, we recommend that you carry out the ‘scratch test for surface strength’ and the ‘water droplet test for surface permeability’ tests that are outlined -in the ‘Floor Substrate Testing’ section below. Then follow our recommendations according to the results you obtain. i.e. if the surface is easily scratched to a depth of 0.3 to 2mm and yet the surface is relatively dense and impermeable, then there is a cement laitance layer present that should be mechanically removed before any treatment is applied. Vacuum blastcleaning is the best and preferred modern method of achieving this. See the section of this webpage on Mechanical Floor Preparation – Vacuum Blast Cleaning below.
- If the surface does not scratch or flake relatively easily, then there is no laitance layer present, but if this surface is dense, very smooth and impermeable, then it still requires mechanical preparation to ‘open’ the surface and increase the profile to achieve an optimum bond for any floor paint. Again carrying out mechanical vacuum blastcleaning is the best and preferred modern method of achieving this quickly and cost effectively.
Help is Available - If you are not confident or comfortable in handling this surface testing and assessment and would like assistance with either the testing and/or the assessment, then we may be able to talk you through it, or even either do, or arrange to do this for you. Please call any of our offices and one of our technical floor painting specialists will discuss the possibilities with you for your project.
Curing Agents & Curing Agent Removal Finally, in deciding on the cleaning and preparation requirements for any new concrete floors or cement screeds prior to floor painting, it is important to ensure that there are no Curing Agent residues on the surfaces from the concrete flooring contractors’ finishing works. These curing agents are usually acrylic resin or wax based, and they are designed to improve the curing and hardening of the concrete by reducing the initial rates of water evaporation. This allows good hydration to proceed without shrinkage cracking, or excessive rates of evaporation that can result in inadequate hydration and therefore weak surfaces prone to dusting.
Fortunately Curing Agents are normally not now used on domestic floors or for smaller commercial and industrial floor areas (but if possible, please check with your builder to be sure they are not used). Additionally the use of any such surface applied curing agents should be specifically excluded in the specification documents for any industrial factory, warehouse or commercial facilities concrete floor that is due to receive a floor paint, or other any resin based flooring treatment. – Please check with your architect, engineer or building contractor to confirm that this is the case.
Where any such surface curing agents have been used, then it will be necessary to carry out some additional mechanical surface preparation by mechanical grinding, or vacuum blast-cleaning to remove them. The claimed ‘natural’ degradation of some curing agent products is dependent on too may other factors including thickness, UV light exposure for example, therefore this is far too variable and so can not be relied on in any specific time. - Please refer to our ‘Mechanical Floor Preparation’ section below).
When applying floor paint on existing concrete floors or on existing cement screed floors, the same requirements exist as outlined above for new floors. However, it is likely that the original concrete mix water will have dried out, that any cement laitance layer could have been removed by dusting in use and under traffic, plus any residual curing agents could also have been removed by the traffic, or have naturally degraded (as they are designed to do). To be certain of the condition of your existing floor then the same tests and recommendations given above can still be carried out – Please see our ‘Floor Substrate Testing’ section below. Also it is important to remember that the floor’s surface condition may not be the same everywhere on your floor, i.e. the perimeter edges and central areas or traffic aisles are likely to be less worn. Therefore several different locations should be tested and assessed to determine what additional preparatory works need to be carried out.
Surface Cleaning Prior to Floor Painting:
The more obvious requirements for existing concrete and cement screed floors are all concerned with cleaning and possibly also in the need for repairing any surface damage such as cracks etc., prior to applying the appropriate new floor paint.
On any older concrete floor surface that has been used and contaminated this normally always involves a selection or combination of thorough detergent cleaning, followed by rinsing with clean water, or by using any combination of floor cleaning equipment, steam cleaning equipment, or simply brushing off the surface. – This should obviously include whatever is appropriate to removing the dirt and contamination that exists. Rinsing thoroughly with clean water is essential after any necessary cleaning is completed, preferably immediately followed by wet vacuuming the residue to ensure the removal of all of the dirt and cleaning materials. This is also important to reduce the amount of water remaining in the concrete floor that has to be allowed to evaporate prior to the floor paint application.
The floors must then be allowed to dry for a minimum of at least 2 days in most instances, the necessary time allowed for this drying should be appropriate to the amount of cleaning water used and the ambient temperatures in the area. If there is excessive dirt and contamination remaining after the first cleaning routine, then the cleaning procedure should be repeated.
If the contamination is heavy, or there are residual oils or grease in the floor, then there are special solutions and techniques that can remove these – For specific advice in these situations please call any of our offices and one of our flooring specialists will be happy to assist you. If you can have them available, then photographs of your existing floor problems will often enable us to fully assess your situation and requirements -more quickly and make proposals to solve them. -Photographs should be emailed to us at technical@nccinaction.co.uk together with a few details of the problem and your requirements for the area in the future.
After cleaning it is quite common for other existing surface defects to become apparent. So if there is any surface damage, cracks or joints with damaged arises (joint edges), in the floor areas to be treated, then these must also be repaired appropriately prior to the application of any floor paint. Please refer to the ‘Damage Repair, Cracks and Joints’ section below.
Summary of Floor Cleaning and Surface Preparation for Floor Painting: In summary, the principle cleaning and surface preparations requirements for successfully applying a floor paint on a concrete or cement screed floor are to achieve: a sound, clean, dry, open-textured concrete or cement screed surface that will allow the floor paint to appropriately penetrate and / or bond to its surface.
As previously outlined above, if you are uncertain of the condition of your specific floor, then we may well be able to talk you through it, or even do it, or arrange for someone to carry this out for you. Please call any of our offices and one of our flooring specialists will be happy to discuss the possibilities for your specific project.
The simple tests that we recommend that you carry out before floor painting on your project include:-
4. i. Surface Permeability / Absorbency Test (Water Droplet Testing)
The application of single droplets of water onto a concrete surface, observing any movement, and monitoring their rate of absorbency can give a good indication of the surface level, density and permeability, the presence of any previous surface treatments and therefore if a floor paint will successfully be able to penetrate into the concrete.
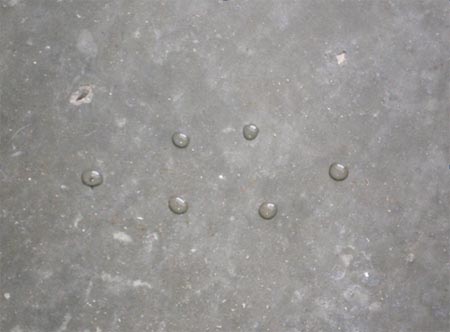
Water droplet testing should be carried out using groups of approximately 6 water droplets in each part of the floor, and on any typical locations and any areas that are discernibly different in appearance or texture / profile. Place the droplets using a simple ‘dropper’, syringe or pipette (available from any chemist) , place them together within an area approximately 10cm x 10cm, be sure to always test at least the centre and the perimeter areas of your floor – as these can often be finished differently by concrete flooring contractors and they can also be used and trafficked differently in service.
For Dense Concrete Surfaces – Smooth, hard and almost ‘shiny’ surfaces.
If this area is to receive a floor paint coating and then be subject to vehicular traffic or other aggressive exposure then mechanical preparation is required to open the surface and ensure good penetration and adhesion of the floor paint.
For Open Textured Concrete Surfaces – Concrete surfaces that are ‘dull’ and not shiny in any areas, and may have already been brush or wood float finished, or previously mechanically finished or prepared i.e. by grinding or sanding to level or for other reasons (such as wall construction etc.).
This concrete surface is almost suitable for the application of a floor paint coating with only thorough cleaning and the removal of any existing dirt and dust – preferably by use of a suitable industrial vacuum cleaner. Wet vacuum if detergent cleaning and rinsing is necessary.
A Typical Table of Results and Conclusions from the Water Droplet Test
Conclusions from this Floor Testing Example: In this example it is evident that the perimeter of both areas has a different concrete surface to the central areas. – This could be due to the central areas being power floated and the perimeters being hand trowelled (i.e. there has been less ‘finishing’ and there has not been so much laitance brought to the surface, or that it is a very good, dense, non-absorbent concrete surface – with or without an additional curing agent applied). Alternatively the perimeter areas may have been ground with a grinding machine to ensure a good ‘key’ for building the blockwork walls.
In either situation this concrete floor definitely requires additional mechanical preparation before applying a successful floor paint finish. The most practical and cost effective solution is vacuum blastcleaning, which will cost approximately £2 to £4 per square metre, dependent on the area and access, etc. Alternatives could include mechanical grinding at a similar cost. Rotary Scabbling would be more expensive and more destructive, as it fractures larger aggregates and creates a rougher profile that is also not ideal for floor paints, which are normally applied in 2 or 3 coats to a total thickness of 150-300 microns (0.15 to 0.3mm) thickness. Acid etching should never be used as a preparatory treatment for floor painting, as explained below in Section 4.
4. ii. Surface Strength – Scratch Testing / Cross Hatch Testing
There are a number of tests for the surface strength of concrete floors that generally involve fairly expensive to very expensive equipment from Schmidt Hammers to Nuclear Density Testing Machines – However there are some far less expensive practical tests that anyone can do with only basic equipment, to still give a very good indication of the surface strength and its condition.
-Concrete surfaces can be assessed with:
4. iii. Moisture Content of Concrete Floors Prior to Floor Painting
The moisture content of a concrete floor or cement screed is another very important factor in achieving a successful floor painting job. This applies to both new and existing floors and relates to not only the original excess concrete mix water, i.e. the water content of the fresh concrete that must be allowed to evaporate; but to the presence and integrity (or not) of an adequate Damp Proof Membrane (DPM) beneath the concrete floor slab; plus to the presence and integrity (or not) of any water supply or drainage system through the concrete; and finally of course to the areas recent exposure to rainfall or water from cleaning or other processes.
As previously stated elsewhere in this website, the general rule for painting concrete floors is that for a vapour tight floor paint or resin coating to be applied successfully, the substrate moisture content must be less than or equal to 4% by volume of the concrete.
To explain this briefly:
As the concrete hardening process (hydration) uses only around 100 litres (0.27 W:C ratio) then there are approximately 100 litres per m³ that need to come out – and as a new floor should always have a good DPM below it , then the vast majority of this water must come out through evaporation from the floor's top surface. With a typical 200mm thick industrial / commercial concrete floor slab, one cubic metre of concrete provides 5 square metres of floor – This means there are 20 litres of water that need to evaporate from every square metre – A considerable amount to come out of the surface.
This hopefully also explains why adequate ventilation and curing techniques are also important for the correct hardening of the floor. In order to ensure uniform strength, particularly of the new concrete's - surface layer, this rate of water evaporation must be minimised and controlled in its early stages, so that the water evaporation pore diameter is small, and that the surface layer itself is able to hydrate and harden correctly. – Otherwise this surface layer of the concrete floor slab will be weak, porous, easy to wear and prone to dusting.
This correct curing is normally best achieved by covering the freshly laid and finished concrete with a combination of hessian, plastic sheeting, or even special concrete floor curing mats.
Alternatively on large new concrete floor areas, resin or wax based Curing Agents can sometimes be sprayed on the freshly finished floor surface to act as a barrier and reduce the rate of evaporation. However, as previously mentioned, this method is totally inappropriate when floor painting is subsequently to be carried out.
New concrete should normally remain covered for 2-3 weeks followed by a further period of at least 2 weeks uncovered, but protected from the weather, and with good ventilation. This results in the minimum 28 day ‘rule of thumb’ period of curing prior to any floor painting or over coating works being carried out.
However as this is obviously a very generalised rule, given all the possible variables, at Buy Floor Paint we always recommend that the actual moisture content of a floor is still always tested and in several representative areas, to confirm it’s compliance with the requirements of the floor paint or resin flooring system selected. This is exactly the same requirement that we recommend on both new and existing concrete and cement screed floors.
4. iii. Measuring the Concrete Floor's Water / Moisture Content
Moisture Testing Equipment:
Fortunately this is easily done by measuring the actual moisture content with a Surface Moisture Meter (such as a Tramex Meter, which are now widely available and they cost around £300 to £600 according to capabilities.) However the test procedure itself is also critically important because the meter will only measure the moisture content of the surface (as the name says), which does not take into account the residual moisture throughout the rest of the slab, or water that is still moving through the slab as water vapour, en-route to evaporate from the floor surface.
In most concrete flooring situation the cheaper type of surface moisture measuring meters are ideal, provided the test procedure is carried out correctly.
Moisture Testing Procedure for Concrete Floors Prior to Floor Painting:
The concrete floor areas selected to be tested should first be covered with a dense, impermeable plastic or rubber mat. NCC Buy Floor Paint recommend that this must have dimensions of at least 600mm x 600mm (although current USA standards now propose 900mm x 900mm), for a period of at least 24 hours before removing it and immediately testing the moisture content of the concrete surface beneath it in several places (always take an average of at least 3 results.)
Concrete Floor Moisture Testing Tip: If water droplets are present or if a significantly darker patch has developed when the mat is lifted, then a further waiting period and drying-out is required, -or an alternative floor painting system that can accommodate these conditions is necessary.
Buy Floor Paint can usually arrange to help you test the moisture content of your floor in an appropriate way, by using our own equipment, or by putting you in touch with a local specialist having the right equipment and experience to assist you. Call any of our offices and of our flooring specialists will be pleased to assist you.
Buy Floor Paint have developed a network of these specialists throughout the UK, who have demonstrated this expertise and have the experience to do this work quickly and efficiently – For details of these professional floor preparation, or floor painting contractors that also have this capability, please contact any of our offices and one of our flooring specialists will be pleased to assist you.
Below we have tried to present a summary and introduction to the most commonly used and widely available floor preparation and cleaning methods and equipment in the UK today which include:
5. i. Acid Etching We include and reference acid etching in this guide as it still persists in some areas of the country. However - Please do not use ‘acid etching’ as it is now only proposed by a few people who have yet to update themselves with the latest technologies and advice in regards to the preparation of reinforced concrete floors and cement screeds to receive floor paints, or indeed they have not read the UK Health and Safety Legislation which strongly advises against any form of acid etching on concrete floors, making very stringent limitations and liabilities clear!
All of the UK Paint Manufacturing and Flooring Trade Associations such as FeRFA and the PMA now All clearly state that the 'acid etching of concrete floors is not recommended'’.
This is basically for a combination of health, environment and floor durability reasons, because the concentrated and diluted acids used (normally Hydrochloric/Muriatic or Phosphoric Acids) are all extremely dangerous in transport, handling and application in the home or on site, particularly with the large quantities required to etch a concrete floor. The hazards arise from the risks of potential direct acid contact with the skin and eyes, plus the risk of breathing unknown fumes when it reacts and attacks the concrete surface and any contaminants in or on the surface. These chemical gases will therefore depend on the precise type of ‘dirt or contamination’ on the floor and how it reacts with the acid – Would you like to risk and breathe these?
Additionally, it is almost impossible to adequately reclaim, neutralise and safely dispose of the large volume of liquid residue in accordance with Environmental Control Regulations – It is now strictly illegal to allow any of this waste water to enter the drainage- system (the individuals, the contractor and the facilities management and owner can ALL be charged, heavily fined and made to pay for any and whatever clean-up is required by the Environment Agency and the Local Authority concerned).
Finally with respect to the concrete floor’s durability, the acid will of course also immediately penetrate directly into any cracks or joints in the concrete floor and therefore it will attack the reinforcing bars, steel stanchions or machine base fixings, causing accelerated steel corrosion – The acid will also attack any steel plant or equipment on the floor. Plus to be effective on a floor acid etching requires the concrete to be absolutely saturated with water before the acid’s it’s application, then following the reaction time (very varied), this is followed by multiple rinsing of the surface with clean water to remove the acid and other residues which then significantly extends the floor drying and waiting times. Some of the calcareous and other soluble salts produced in the acid’s reaction with the concrete surface are also inevitably left in the concrete; these acid residues can also subsequently cause osmotic blistering or de-bonding and delamination of floor paints. These subsequent problems can arise even several weeks or many months later and after what may have initially seemed to be a successful job was ‘completed’.
SO PLEASE DO NOT ACID ETCH YOUR FLOORS – it is never worth the risks
– If surface preparation is necessary then it makes sense to use mechanical grinding or vacuum blastcleaning, especially with the extremely efficient and cost effective equipment now available for hire – or you can get a local specialist to do it – We can recommend many competent floor preparation specialist contractors that can prepare your floor, or they will even contract to do the whole job and apply the concrete floor paint on your project – This network of contractors are available for floor painting projects anywhere in the UK.
5. ii. Mechanical Surface Preparation of Concrete Floors: The development in mechanical floor preparation equipment has been considerable over the last 10-20 years, with modern purpose made vacuum blastcleaning, grinding and rotary scabbling machines now widely available. The new machines are fast, precise, controlled and almost totally dust free. Therefore they are also very cost effective on site.
Buy Floor Paint can provide you with details on the most appropriate method and equipment to use for your project, together with the names of hire companies that will rent you these machines or, if you prefer, specialist floor preparation contractors that are very experienced in their use, so they can usually do the work for you and even more competitively than you can yourself! Indeed most of the UK’s major resin - flooring and floor painting specialist contractors also now use these companies to do their floor surface preparation work. Therefore it is very often cost effective to get one of our specialist flooring contractors to do the whole job for you and provide a guaranteed floor finish – especially on larger areas over a few hundred square metres.
For more details on floor preparation equipment, floor preparation contractors or resin floor painting contractors near you, please contact any of our offices and our flooring specialists will be pleased to assist you on your specific project.
The following is a brief overview of the different mechanical floor preparation techniques and equipment available for concrete floor surfaces:
5. ii. A. Hand Wire Brushing to Prepare Concrete Floors for Painting
Whilst this is not really ‘mechanical equipment’ and obviously impractical for large industrial or commercial areas, hand wire brushing can be useful, practical and cheap for smaller areas, such as domestic garages or workshops, etc.
The wire brushes should be used wearing good tough gardening / construction gloves (to prevent taking your knuckles off!) and disposable masks (to avoid choking yourself on the dust created!) Work evenly over the surface, removing any soft and friable material – Hand wire brushing will not be suitable for dense, power floated concrete floors as they will not be strong enough and may even only polish the surface. – Stronger mechanical preparation equipment will be required for these surfaces – see below. When the surface has all been uniformly brushed and all of the soft / friable material has been removed, sweep thoroughly and vacuum to remove the residual dust from the surface pores of the concrete.
5. ii. B. Mechanical Grinding to Prepare Concrete Floors for Painting
Mechanical floor grinding machines were the most widely used type of floor preparation equipment, but they lost market this position with the improved development of vacuum blastcleaning machines. The main reasons for this being that the modern vacuum blastcleaning machines have become much more affordable and they are much faster, with greater uniformity of finish. Plus there is also the technical argument that grinding can force dust into the surface pores and therefore this can create an ‘integral debonding agent’ or even ‘polish’ the concrete surface thus greatly reducing subsequent adhesion of the floor paint.
However in recent years floor grinding machine manufacturers have also progressed and developed efficient vacuum floor grinding machines with different sized grinding ‘heads’. Certainly on small to medium sized projects, up to a few hundred square metres, these new grinding machines can also provide an efficient and cost effective solution. Generally wire brush ‘heads’ should be avoided for this purpose as they will actually polish already dense floor surfaces. The abrasive diamond grinding heads are more appropriate for use prior to floor painting.
Good mechanical grinding machinery manufacturers include HTC (Swedish), Asuga (Danish) and Klindex-Chemspec (Italian). We do not currently know any that are still made in the UK, but these machines are widely available.
Important Note: These modern grinding machines are in fact clearly the best equipment to use if:
-the floors to be prepared are wet or damp at the time, because vacuum blastcleaning machines do not work at all well on damp / wet concrete surfaces.
if the floor surfaces are uneven and profiled, then the machines grinding action also increases uniformity and reduces any excessive profiles that would adversely reflect through a floor paint coating,
if there are ‘rubbery’ residues on the floor to be removed, such as old elastomeric coatings, bituminous materials or flexible / elastic adhesive residues - like, those used for some floor tiles or sheet vinyl floors, because vacuum blastcleaning does not remove these materials very well. This is because the impact of the shot is deflected or absorbed by these ‘rubbery’ materials.
Today these modern mechanical floor grinding machines are widely available to hire, or there are specialist floor preparation contractors who can do this work efficiently and effectively for you. As a guide, dependent of the area to prepare, the specific model of machine and grinding heads, the floor condition, access, etc., then up to 1000m² per day can be readily achieved.
If you would like more specific advice on the right mechanical floor grinding equipment for your specific project, then please call any of our offices and one of our flooring specialists will be happy to assist and advise you.
5. ii. C. Vacuum Blastcleaning of Concrete Floors for Floor Painting
The principle of blastcleaning is firing sand, grit or steel shot abrasive at high velocity in a stream of air, at an angle to the concrete surface. The localised impact removes any loose or friable materials and it also locally fractures and very effectively removes any brittle layers, such as cement laitance.
This used to be a very noisy, dirty, dusty and disruptive process, but the development of modern high performance and very efficient machines with integral vacuum collection of the dust and waste, plus the use of recoverable rounded steel shot, means that the process is now very fast, clean, and controllable, plus it is almost dust free.
Due to the partially magnetic recycling process, the abrasive used in these modern machines is always now steel shot.
Small machines are available for hire with a 200-250mm wide enclosed head that can prepare approximately 50m²/hour – these cost around £300 per day or £800 per week, (always get a magnetic roller for around £15/day as well, to recover and recycle more of the shot and therefore save costs on bags of shot that are around £30/25kgs).
Medium sized vacuum blastcleaning machines capable of preparing around or even over 100m²/hour are available from around £400/day; however these will usually require an industrial 3 phase electrical supply. Large machines, including ride on equipment are also available for very large areas, but these are not available for hire and are only suitable for professional use.
Buy Floor Paint can advise you on the most appropriate vacuum blastcleaning machines and equipment for your project, plus where you can hire them to do the work yourself. Alternatively we can also put you in touch with professional floor preparation contractors that, are very experienced and can therefore carry out your floor preparation works efficiently and cost effectively for you.
The nature (moving or non-moving) and the cause of any cracks in the floor must also be determined and then they can be treated appropriately to ensure there is no future cracking.
6. i. The Repair of Concrete Defects and Damage Prior to Floor Painting
Floor repairs are sometimes necessary before applying any sort of floor paint, as otherwise any damage or imperfections in the surface will be reflected through and even highlighted by the new floor paint. Floor repairs are also frequently required after damage caused by traffic and other mechanical wear or impact, plus there can be damage due to cracks or the breakdown of floor joint arrises (the joint edges).
Surface damage on concrete and screed floors can therefore be due to many different reasons including defects in the original concreting work, i.e. honeycombing and voids, unsuitable aggregates such as ‘mudstone’, inadequate finishing or poor curing, etc. Or post-construction damage can be caused by impact, wear, abrasion or chemical exposure and attack during service.
The first requirement is always to establish the cause and extent of the damage to assess if it is likely to reoccur, then to mechanically break out and remove any unsound or weak concrete.
The best method of repair will depend on the size and depth of repair required, the floor areas future performance and exposure envisaged, plus the time available, and the ambient conditions at the time the repair has to be made. Basically good repairs can be made with cement based mortars or fast curing epoxy resin based mortars if time is critical. Larger, thicker areas are usually repaired with concrete providing there is sufficient time for it to harden and cure to the acceptable moisture content for the floor paint system selected.
At NCC we can advise on detailed solutions for all types of floor repairs where these are necessary prior to painting the floor.
CAUTION - 'Polyfilla' type materials from DIY Stores and the like are totally unsuitable for pre-floor painting repairs, and all of these materials will only 'pop-out' again to spoil the finish shortly after you have completed your lovely new floor painting job. DO NOT EVER USE THIS TYPE OF FILLER FOR FLOOR REPAIRS.
Sand and cement premixed products, or sand and cement mortars mixed on site can be used, but only when the prepared concrete is thoroughly pre-wetted, and then the finished repairs must also be kept damp, covered and cured correctly - Unfortunately this will also delay the floor painting work by at least a week, and even up to a month or more; in order to allow the concrete to dry out again and be suitable to accept the floor paint. This is because of a combination of technical reasons – the time required for the material to harden, the time for the mortar to reach acceptably low moisture content and the time required for the mortars surface alkalinity to be neutralised by natural atmospheric carbonation.
However in most situations where there is minor damage or voids in the floor, or localised areas of damage in the concrete floor surface, then the best and easiest pre-treatment before painting, is for these to be filled and made good using a fast curing epoxy resin based adhesive mortar. One of the best products to use for this is Sikadur 31 GB Rapid Mortar. This 2-component epoxy resin mortar is easily mixed in the tin, and then applied by trowel or spatula to fill the voids and repair the damage. if there are deeper holes needing thicker layers then the mortar can be extended and made even more cost effective, by the addition of fine kiln dried quartz sand.
Alternatively for slightly larger or deeper areas of damage or arrises to repair, you can use our complete Epoxy Floor Repair Kit, which comes in a single 10kg pail containing the resin and hardener in unique easy to mix packaging, plus the correct amount of aggregate filler, even a pair of gloves (should always be worn to use epoxy materials) and a brush to apply some of the mixed resin as a primer / tack-coat on the surface.
For larger areas of concrete floor surface damage, it is often also cost effective when time and delay / waiting times and repair performance are considered, rather than simply just the materials cost, to use Sikafloor 161 Epoxy Mortar. This is a fast-setting, solvent-free epoxy resin binder, that can be mixed from 1:3 up to 1:6 parts by weight with kiln dried, graded silica or quartz sand. This is then applied by flow or screed application techniques over the damaged areas of the surface by using the edge of a trowel, or with a squeegee blade as appropriate.
The floor painting works can then proceed quickly and without delay the very next day (even later the same day in heated areas).
Buy Floor Paint stock and supply a full range of floor repair products from concrete additives to improve strength, accelerate hardening and reduce the initial water content, prebatched cement and rapid hardening cement based repair mortars, plus a full range of epoxy resin based repair mortars. Therefore whatever damage you have on your floor we can provide detailed recommendation and instructions together with the materials.
For advice and assistance in any aspect of floor repairs, please call any of our offices and one of our flooring specialists will be pleased to help solve your problem. This is because due to the wide extent of different floor repair solutions and techniques required.
6. ii. Crack Repairs in Concrete Floors Prior to Floor Painting
Cracks in concrete floors can be caused by a large number of reasons including initial or long-term concrete shrinkage, building movement or settlement, machine vibration or excessive loading, plus inadequate or incorrect joint design or slab construction. To successfully repair and seal cracks in concrete floors it is always important to understand the exact reason for the crack and if any further movement will occur. This can obviously be a technical issue and so a qualified structural engineer should normally be involved to determine this for any significant cracks or important projects. In new construction projects, it is especially important to do this as early as possible to determine the correct remedial action and the responsibility of course!
Buy Floor Paint can advise you on how best to do this for your project, please call any of our offices and one of our flooring specialists will be pleased to assist you.
• Treating Moving Cracks in Concrete Floors Prior to Floor Painting
If cracks are still likely to be subject to future movement then they should normally be treated as joints. This means that they should be cut square, brought through the floor finish and after the floor painting is complete, they should be sealed with an appropriate floor joint sealant such as Sikaflex PRO 3WP – See the Joints and Joint Edge (Arris) Repairs section below.
• Treating Non-Moving Cracks in Concrete Floors Prior to Floor Painting
In situations where it is the structural engineers’ assessment that a crack is no longer moving, then it can be repaired and sealed prior to applying the selected resin floor paint. The best procedure and materials for doing this obviously depends on the width, depth and length of the crack. It is likely that the surface will need opening by cutting it out to remove any loose or weakened material. Then it can either be filled and surface sealed with a fine epoxy mortar such as Sikadur 31 pressed into the crack, alternatively where advised by the engineer for structural reasons, cracks can be structurally bonded by low or high pressure injection with an epoxy resin injection product such as Sikadur 52.
All of these repair and injection materials, method statements and detailed specifications are available from NCC Buy Floor Paint.
For detailed advice on your specific project please call any of our offices and one of our flooring specialists will be pleased to assist you.
6. iii. Joint and Joint Edge (Arris) Repairs Prior to Floor Painting
Movement joints in new concrete floor slabs should normally be sealed with the appropriate elastic floor joint sealant, with the correct joint movement capability and other performance requirements after the floor finish has been applied.
Existing movement joints in existing concrete floor slabs can be painted up to, or over-coated; dependent on the nature of the existing floor joint sealant, i.e. bitumen sealants can not be painted with resin floor paints.
If joint arrises are broken or the existing sealant has deteriorated or failed completely, then the joints should be cut out and repaired, then resealed after applying the selected floor paint. High strength epoxy resin mortars are the best materials for joint arris repairs, because of the high loads that can be imposed on these edges. The best type of replacement joint sealant is dependent on the type of failed joint sealant, i.e. different sealant types can be incompatible and not bond with the previous sealant residues on the joint sides, which is a particular problem with old bituminous or silicone sealants.
Buy Floor Paint supply a full range of epoxy resin mortars to repair joint arrises, and a full range of floor joint sealants based on all available material types, including the very useful Sikaflex PRO 3WF – a high performance, easily applied, chemically resistant, elastic, single pack, polyurethane resin based floor joint sealant, which is ideal for solving a great many floor jointing problems.
For specific advice on treating the floor joints in your specific project, please call any of our offices and one of our flooring specialists will be pleased to assist you. Photographs can often help us to quickly identify the correct procedure and products to use to and so these can be sent to technical@nccinaction.co.uk, together with a brief summary of the situation and your future requirements for the area.
– And yet no one with any common sense would even consider not cleaning and preparing all of these other surfaces before painting them! – Additionally as an example - Newly plastered or rendered walls do not normally need any extra cleaning or surface preparation, other than full drying out and cleaning and dust or dirt from the surface, before painting them, usually with water based emulsion paints. – This is because these wall surface are porous and at least some of the paint penetrates into the wall, provided they have been given time to dry out sufficiently (if it doesn’t you will see the paint peel off your plaster – a dead giveaway to plaster that has been painted to soon and before it had dried out sufficiently – So now you know – Surface preparation is basically common sense!. - Plus most importantly - We do not even walk, or drive cars and forklifts on these surfaces!
Floor surface preparation requirements can therefore be considered in such a logical way as well: For concrete floors and cement screeds – If you are going to expose your painted floor to frequent foot traffic, and / or any kind of wheeled vehicle traffic, then it makes sense to carry out some form of surface cleaning and preparation to ensure that your new floor paint will adequately penetrate and / or bond (stick) to the sound concrete and not just to a layer of dirt or dust on its surface.
So the floor cleaning and surface preparation should be carried out – according to the floors existing condition, the specific future floors exposure and the type of floor paint you are going to use? Even a simple water based epoxy resin floor paint is £65 – 70 for 5 litres, so the absolute minimum to consider giving yourself a chance of success, is to make sure the concrete or cement screed floor area is clean and dry plus to brush the surface thoroughly with a stiff bristle or wire brush, to ensure you remove any visible dirt or dust and any loose particles. Finally always vacuum the surfaces thoroughly immediately before applying the floor paint.
For the application of floor paint in more demanding areas or for high performance where the floor will be subject to frequent traffic, fork lift trucking, possible chemical spillages and where long term durability is required, it is logical that a full evaluation of the best and most suitable cleaning and / or additional surface preparation requirements is made - Common sense.
This is the same for any floor paint that you want to last in these situations, including our water based epoxy resin floor paints and the highest performance solvent free epoxy resin based floor paints, which cost up to £150 for 5 litres, so it makes sense to do or get the job done ‘Right First Time’.
We have Summarized a few Simple 'Rules' for Floor Cleaning & Surface Preparation before Floor Painting as follows:
- Floor paint should only be applied to dry concrete or cement screed surfaces.- Any dirt, dust or other loose / friable materials must be removed.
- Any surface contaminants such as oils, grease and anyr other past spillages or old floor polish residues etc. must be removed.
- On new fully hardened concrete and cement screed surfaces any curing agent residues or any cement laitance must be removed (see New Concrete and Cement Screed Floors below).
- The concrete or cement screed substrates must be sufficiently thick, sound and strong enough to meet your service requirements. As an example - industrial floors in factories, warehouses and commercial facilities are recommended to have a compressive strength of at least 25Mpa and a pull off strength of at least 1.5Mpa – This is not normally a problem for new floors – (See New Concrete and Screed Floors section below). But existing floor strength should always be checked – See ‘Floor Substrate Testing’ below.
- Any existing de-bonded, loose or flaking floor paints must be removed (some firmly adhering, sound existing floor paints can be overcoated, but only with an appropriate type of floor paint product – So this depends on the type of existing materials and your future floor paint performance requirements.
i.e.
| o | Existing sound and fully bonded acrylic / urethane alkyd type single pack paints should only be over-coated with a similar material - Or probably it would be better to remove it and do the job properly with a more durable water based epoxy floor paint for example – It is nearly always much cheaper in the long run! |
| o | Existing sound and fully bonded moisture cured polyurethane resin floor paints can be over-coated with epoxy -resin based paints provided the surface is uniformly finely abraded to provide a key (i.e. with suitable abrasive pads etc.) |
| o | Existing sound and fully bonded solvent based epoxy resin or solvent free epoxy resin, floor paints can be over-coated with any epoxy resin based floor paints, provided the surface is uniformly finely abraded to provide a key (i.e. with suitable abrasive pads etc.) |
| o | Existing sound and fully bonded water based epoxy floor paints can be directly over-coated with any water based epoxy floor paints, the surface only needs to be thoroughly cleaned, and there is no need to additionally abrade the surface of these materials. |
- By following these relatively simple rules above for floor cleaning and surface preparation on concrete floors and cement floor screeds, you will be assured of a successful floor painting job.
More information and details on exactly how to do this assessment and preparation are given in each of the sections below – But if you have any concerns or additional questions, please do not hesitate to call any of our offices and one of our floor painting specialists will be happy to assist you with your specific project requirements.
2. Cleaning and Surface Preparation for New Concrete and Cement Screed Floors for Successful Floor Painting
For most domestic and light duty floor painting projects, the three most important criteria are: ensuring that the concrete or cement screed is fully cured (hardened), that it is dry, plus ensuring that the surface has been finished correctly.Curing, Hardening & Drying-out for Floor Painting:
This means that a concrete floor slab must always be a minimum of 28 days old before any floor painting work is carried out – And this is always provided they are indoors, protected and not exposed to rainfall, or water run-off etc.
For larger areas and thicker concrete floor slabs, as used for the normal medium to heavy duty service requirements, in most institutional, retail, commercial and industrial premises, the concrete can actually take much longer to dry out. – For example a new 200mm thick ground floor concrete slab laid over a DPM without any additional heating or ventilation, can take up to a full year to dry out to a moisture content of 4% by volume – which is the maximum recommended for the application of any vapour tight resin floor paint.
However, there are now floor systems, such as our range of water based epoxy floor paints that are suitable for earlier application. This is because whilst they are waterproof, they are also vapour permeable, meaning that the concrete can continue to dry out under the freshly applied fully bonded floor paint.
- If you think that you may have an excessive moisture content that could cause a problem, then we recommend that you carry out the ‘Moisture Mat’ test in the ‘Floor Substrate Testing’ section below and then again follow the recommendations according to your test results.
Additionally, if your project does require the use of a vapour-tight, solvent free epoxy floor paint in order to meet your heavy duty exposure or other special performance requirements, then it is still possible to do the work successfully, by using one or more of the following solutions before applying the selected solvent free epoxy floor paint product:-
- Using additional drying equipment. - Using special water reducing admixtures in the concrete. - Using a special moisture barrier system from us (such as Sika EpoCem technology).
Obviously all of these have different time/cost and technical implications dependant on the project, so in these instances we recommend that you speak to one of the flooring specialists in any of our offices, who will be pleased to assist you in identifying the fastest and most cost effective solution for your floor painting project.
Surface Finishing & Cement Laitance Limitations for Floor Painting:
For successful floor painting it is essential to ensure that the surface has not been ‘over-finished’, which can make the surface very dense and impermeable, but also create a weak and friable layer. – This weak but brittle surface layer is known as ‘cement laitance’, and it’s presence means that floor paint will not penetrate into the concrete, however it will probably bond and ‘stick’ very well to this cement laitance layer – the whole of this weak surface layer will eventually de-bond and come off, bringing with it your newly applied floor paint! How soon this will happen is dependent on the floors exposure to traffic and variations in temperature etc. – The more frequent these are, then the faster the cement laitance layer will de-bond and your new floor will ‘fail’.
- If you think that you have a cement laitance problem on your new concrete floor, we recommend that you carry out the ‘scratch test for surface strength’ and the ‘water droplet test for surface permeability’ tests that are outlined -in the ‘Floor Substrate Testing’ section below. Then follow our recommendations according to the results you obtain. i.e. if the surface is easily scratched to a depth of 0.3 to 2mm and yet the surface is relatively dense and impermeable, then there is a cement laitance layer present that should be mechanically removed before any treatment is applied. Vacuum blastcleaning is the best and preferred modern method of achieving this. See the section of this webpage on Mechanical Floor Preparation – Vacuum Blast Cleaning below.
- If the surface does not scratch or flake relatively easily, then there is no laitance layer present, but if this surface is dense, very smooth and impermeable, then it still requires mechanical preparation to ‘open’ the surface and increase the profile to achieve an optimum bond for any floor paint. Again carrying out mechanical vacuum blastcleaning is the best and preferred modern method of achieving this quickly and cost effectively.
Help is Available - If you are not confident or comfortable in handling this surface testing and assessment and would like assistance with either the testing and/or the assessment, then we may be able to talk you through it, or even either do, or arrange to do this for you. Please call any of our offices and one of our technical floor painting specialists will discuss the possibilities with you for your project.
Curing Agents & Curing Agent Removal Finally, in deciding on the cleaning and preparation requirements for any new concrete floors or cement screeds prior to floor painting, it is important to ensure that there are no Curing Agent residues on the surfaces from the concrete flooring contractors’ finishing works. These curing agents are usually acrylic resin or wax based, and they are designed to improve the curing and hardening of the concrete by reducing the initial rates of water evaporation. This allows good hydration to proceed without shrinkage cracking, or excessive rates of evaporation that can result in inadequate hydration and therefore weak surfaces prone to dusting.
Fortunately Curing Agents are normally not now used on domestic floors or for smaller commercial and industrial floor areas (but if possible, please check with your builder to be sure they are not used). Additionally the use of any such surface applied curing agents should be specifically excluded in the specification documents for any industrial factory, warehouse or commercial facilities concrete floor that is due to receive a floor paint, or other any resin based flooring treatment. – Please check with your architect, engineer or building contractor to confirm that this is the case.
Where any such surface curing agents have been used, then it will be necessary to carry out some additional mechanical surface preparation by mechanical grinding, or vacuum blast-cleaning to remove them. The claimed ‘natural’ degradation of some curing agent products is dependent on too may other factors including thickness, UV light exposure for example, therefore this is far too variable and so can not be relied on in any specific time. - Please refer to our ‘Mechanical Floor Preparation’ section below).
3. Cleaning & Surface Preparation of Older / Existing Concrete and Cement Screed Floors
Surface Condition and Assessment Prior to Floor Painting:When applying floor paint on existing concrete floors or on existing cement screed floors, the same requirements exist as outlined above for new floors. However, it is likely that the original concrete mix water will have dried out, that any cement laitance layer could have been removed by dusting in use and under traffic, plus any residual curing agents could also have been removed by the traffic, or have naturally degraded (as they are designed to do). To be certain of the condition of your existing floor then the same tests and recommendations given above can still be carried out – Please see our ‘Floor Substrate Testing’ section below. Also it is important to remember that the floor’s surface condition may not be the same everywhere on your floor, i.e. the perimeter edges and central areas or traffic aisles are likely to be less worn. Therefore several different locations should be tested and assessed to determine what additional preparatory works need to be carried out.
Surface Cleaning Prior to Floor Painting:
The more obvious requirements for existing concrete and cement screed floors are all concerned with cleaning and possibly also in the need for repairing any surface damage such as cracks etc., prior to applying the appropriate new floor paint.
On any older concrete floor surface that has been used and contaminated this normally always involves a selection or combination of thorough detergent cleaning, followed by rinsing with clean water, or by using any combination of floor cleaning equipment, steam cleaning equipment, or simply brushing off the surface. – This should obviously include whatever is appropriate to removing the dirt and contamination that exists. Rinsing thoroughly with clean water is essential after any necessary cleaning is completed, preferably immediately followed by wet vacuuming the residue to ensure the removal of all of the dirt and cleaning materials. This is also important to reduce the amount of water remaining in the concrete floor that has to be allowed to evaporate prior to the floor paint application.
The floors must then be allowed to dry for a minimum of at least 2 days in most instances, the necessary time allowed for this drying should be appropriate to the amount of cleaning water used and the ambient temperatures in the area. If there is excessive dirt and contamination remaining after the first cleaning routine, then the cleaning procedure should be repeated.
If the contamination is heavy, or there are residual oils or grease in the floor, then there are special solutions and techniques that can remove these – For specific advice in these situations please call any of our offices and one of our flooring specialists will be happy to assist you. If you can have them available, then photographs of your existing floor problems will often enable us to fully assess your situation and requirements -more quickly and make proposals to solve them. -Photographs should be emailed to us at technical@nccinaction.co.uk together with a few details of the problem and your requirements for the area in the future.
After cleaning it is quite common for other existing surface defects to become apparent. So if there is any surface damage, cracks or joints with damaged arises (joint edges), in the floor areas to be treated, then these must also be repaired appropriately prior to the application of any floor paint. Please refer to the ‘Damage Repair, Cracks and Joints’ section below.
Summary of Floor Cleaning and Surface Preparation for Floor Painting: In summary, the principle cleaning and surface preparations requirements for successfully applying a floor paint on a concrete or cement screed floor are to achieve: a sound, clean, dry, open-textured concrete or cement screed surface that will allow the floor paint to appropriately penetrate and / or bond to its surface.
4. Floor Substrate Testing Prior to Floor Paint Application
At Buy Floor Paint we have tried to summarise some simple and practical tests that you can do with commonly available materials and equipment, in order to test the condition and therefore the surface preparation requirements for successful floor painting on your project.As previously outlined above, if you are uncertain of the condition of your specific floor, then we may well be able to talk you through it, or even do it, or arrange for someone to carry this out for you. Please call any of our offices and one of our flooring specialists will be happy to discuss the possibilities for your specific project.
The simple tests that we recommend that you carry out before floor painting on your project include:-
4. i. Surface Permeability / Absorbency Test (Water Droplet Testing)
The application of single droplets of water onto a concrete surface, observing any movement, and monitoring their rate of absorbency can give a good indication of the surface level, density and permeability, the presence of any previous surface treatments and therefore if a floor paint will successfully be able to penetrate into the concrete.
Water droplet testing should be carried out using groups of approximately 6 water droplets in each part of the floor, and on any typical locations and any areas that are discernibly different in appearance or texture / profile. Place the droplets using a simple ‘dropper’, syringe or pipette (available from any chemist) , place them together within an area approximately 10cm x 10cm, be sure to always test at least the centre and the perimeter areas of your floor – as these can often be finished differently by concrete flooring contractors and they can also be used and trafficked differently in service.
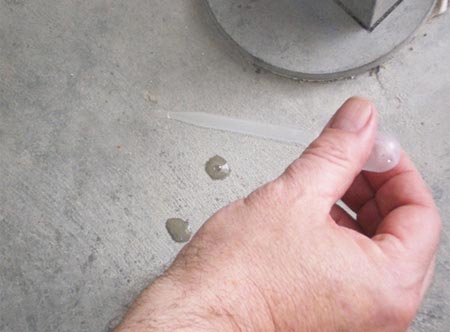
For Dense Concrete Surfaces – Smooth, hard and almost ‘shiny’ surfaces.
 |
 |
| Water Droplet: Pipette Application Note no immediate absorption |
Water Droplets Applied Still no absorption evident after 5 Minutes |
If this area is to receive a floor paint coating and then be subject to vehicular traffic or other aggressive exposure then mechanical preparation is required to open the surface and ensure good penetration and adhesion of the floor paint.
For Open Textured Concrete Surfaces – Concrete surfaces that are ‘dull’ and not shiny in any areas, and may have already been brush or wood float finished, or previously mechanically finished or prepared i.e. by grinding or sanding to level or for other reasons (such as wall construction etc.).
 |
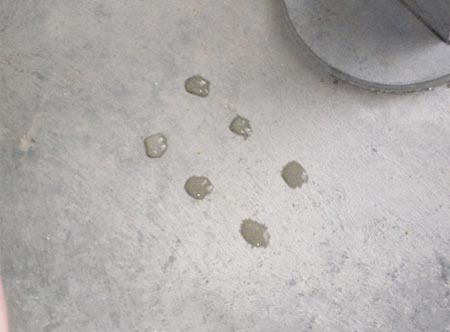 |
| Water Droplet: Pipette Application Note the immediate absorption |
Water Droplets Applied Absorption continues and diameter increases |
This concrete surface is almost suitable for the application of a floor paint coating with only thorough cleaning and the removal of any existing dirt and dust – preferably by use of a suitable industrial vacuum cleaner. Wet vacuum if detergent cleaning and rinsing is necessary.
A Typical Table of Results and Conclusions from the Water Droplet Test
| Project Area 1 | Central Part | All Droplets | Observed at times of 30 seconds, 1 min, 5 mins. Result = No absorbency. Observed at 10 mins. Result = Slight absorbency (5mm darkened ring when droplet removed with a cloth from the surface). |
| Perimeter | All Droplets | Immediately evident absorbency. At 5 min – all droplets completely absorbed (5-10mm darker ring). | |
| Project Area 2 | Central Part | All Droplets | Observed at times of 30 seconds, 1 min, 5 min – No absorbency. 10 min – slight absorbency (5mm darker ring). |
| Perimeter | All Droplets | Immediately evident absorbency. At 5 min – All droplets completely absorbed (5-10mm darker ring). |
Conclusions from this Floor Testing Example: In this example it is evident that the perimeter of both areas has a different concrete surface to the central areas. – This could be due to the central areas being power floated and the perimeters being hand trowelled (i.e. there has been less ‘finishing’ and there has not been so much laitance brought to the surface, or that it is a very good, dense, non-absorbent concrete surface – with or without an additional curing agent applied). Alternatively the perimeter areas may have been ground with a grinding machine to ensure a good ‘key’ for building the blockwork walls.
In either situation this concrete floor definitely requires additional mechanical preparation before applying a successful floor paint finish. The most practical and cost effective solution is vacuum blastcleaning, which will cost approximately £2 to £4 per square metre, dependent on the area and access, etc. Alternatives could include mechanical grinding at a similar cost. Rotary Scabbling would be more expensive and more destructive, as it fractures larger aggregates and creates a rougher profile that is also not ideal for floor paints, which are normally applied in 2 or 3 coats to a total thickness of 150-300 microns (0.15 to 0.3mm) thickness. Acid etching should never be used as a preparatory treatment for floor painting, as explained below in Section 4.
4. ii. Surface Strength – Scratch Testing / Cross Hatch Testing
There are a number of tests for the surface strength of concrete floors that generally involve fairly expensive to very expensive equipment from Schmidt Hammers to Nuclear Density Testing Machines – However there are some far less expensive practical tests that anyone can do with only basic equipment, to still give a very good indication of the surface strength and its condition.
-Concrete surfaces can be assessed with:
A simple surface ‘Scratch Test’, carried out by carefully using a new ‘Stanley knife’ blade against a metal straight edge to try and cut into the concrete surface vertically over a length of about 30cm; and then also with The ease and depth that the blade can cut into the surface should be observed and recorded, together with any ‘powdering’ or ‘flaking’ that occurs.
A ‘Cross Hatch’ test using another of the same type of (new) sharp knife blades. This cross hatching should be made as a grid of at least 5 vertical and 5 diagonally crossing horizontal lines, each at least 30mm in length and with approximately 2-3mm spacing. Then apply and quickly remove ‘gaffer’ or similar strong adhesive tape and examine the results for the depth of the cuts and if there is any discernible fracture or flaking off of the concrete surface around the cross hatch cuts and which will therefore be visible on the back of the tape.
(Note: A similar cross hatch test is also widely used for assessing the adhesion performance of paints and other coatings on steel and other material surfaces).
From a Dense Concrete Example
A ‘Cross Hatch’ test using another of the same type of (new) sharp knife blades. This cross hatching should be made as a grid of at least 5 vertical and 5 diagonally crossing horizontal lines, each at least 30mm in length and with approximately 2-3mm spacing. Then apply and quickly remove ‘gaffer’ or similar strong adhesive tape and examine the results for the depth of the cuts and if there is any discernible fracture or flaking off of the concrete surface around the cross hatch cuts and which will therefore be visible on the back of the tape.
(Note: A similar cross hatch test is also widely used for assessing the adhesion performance of paints and other coatings on steel and other material surfaces).
 |
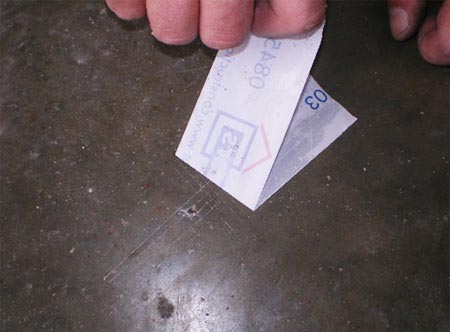 |
| Surface Scratch Test – No visible / significant cut dimensions |
Cross Hatch Test – No visible cuts or flaking on the back of the tape |
| There is no surface powdering or flaking, there is no cement laitance layer, however the surface is extremely hard and dense. If this area is to be subjected to vehicular traffic or other aggressive exposure, then this concrete floor surface requires additional mechanical surface preparation such as blast cleaning or grinding etc., to obtain an open-textured ‘sandpaper’ like surface, which is ideal for achieving optimum penetration / adhesion of a floor paint. | |
4. iii. Moisture Content of Concrete Floors Prior to Floor Painting
The moisture content of a concrete floor or cement screed is another very important factor in achieving a successful floor painting job. This applies to both new and existing floors and relates to not only the original excess concrete mix water, i.e. the water content of the fresh concrete that must be allowed to evaporate; but to the presence and integrity (or not) of an adequate Damp Proof Membrane (DPM) beneath the concrete floor slab; plus to the presence and integrity (or not) of any water supply or drainage system through the concrete; and finally of course to the areas recent exposure to rainfall or water from cleaning or other processes.
As previously stated elsewhere in this website, the general rule for painting concrete floors is that for a vapour tight floor paint or resin coating to be applied successfully, the substrate moisture content must be less than or equal to 4% by volume of the concrete.
To explain this briefly:
| An average concrete mix per m³ today is: | 400 kgs cement |
| 1800 kgs sand and aggregates | |
| 200 kgs / litres of water |
As the concrete hardening process (hydration) uses only around 100 litres (0.27 W:C ratio) then there are approximately 100 litres per m³ that need to come out – and as a new floor should always have a good DPM below it , then the vast majority of this water must come out through evaporation from the floor's top surface. With a typical 200mm thick industrial / commercial concrete floor slab, one cubic metre of concrete provides 5 square metres of floor – This means there are 20 litres of water that need to evaporate from every square metre – A considerable amount to come out of the surface.
This hopefully also explains why adequate ventilation and curing techniques are also important for the correct hardening of the floor. In order to ensure uniform strength, particularly of the new concrete's - surface layer, this rate of water evaporation must be minimised and controlled in its early stages, so that the water evaporation pore diameter is small, and that the surface layer itself is able to hydrate and harden correctly. – Otherwise this surface layer of the concrete floor slab will be weak, porous, easy to wear and prone to dusting.
This correct curing is normally best achieved by covering the freshly laid and finished concrete with a combination of hessian, plastic sheeting, or even special concrete floor curing mats.
Alternatively on large new concrete floor areas, resin or wax based Curing Agents can sometimes be sprayed on the freshly finished floor surface to act as a barrier and reduce the rate of evaporation. However, as previously mentioned, this method is totally inappropriate when floor painting is subsequently to be carried out.
New concrete should normally remain covered for 2-3 weeks followed by a further period of at least 2 weeks uncovered, but protected from the weather, and with good ventilation. This results in the minimum 28 day ‘rule of thumb’ period of curing prior to any floor painting or over coating works being carried out.
However as this is obviously a very generalised rule, given all the possible variables, at Buy Floor Paint we always recommend that the actual moisture content of a floor is still always tested and in several representative areas, to confirm it’s compliance with the requirements of the floor paint or resin flooring system selected. This is exactly the same requirement that we recommend on both new and existing concrete and cement screed floors.
4. iii. Measuring the Concrete Floor's Water / Moisture Content
Moisture Testing Equipment:
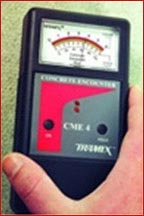
Fortunately this is easily done by measuring the actual moisture content with a Surface Moisture Meter (such as a Tramex Meter, which are now widely available and they cost around £300 to £600 according to capabilities.) However the test procedure itself is also critically important because the meter will only measure the moisture content of the surface (as the name says), which does not take into account the residual moisture throughout the rest of the slab, or water that is still moving through the slab as water vapour, en-route to evaporate from the floor surface.
 |
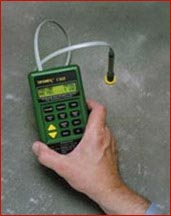 |
| Tramex Surface Moisture Meter | Tramex Inserted Probe Moisture Meter |
In most concrete flooring situation the cheaper type of surface moisture measuring meters are ideal, provided the test procedure is carried out correctly.
Moisture Testing Procedure for Concrete Floors Prior to Floor Painting:
The concrete floor areas selected to be tested should first be covered with a dense, impermeable plastic or rubber mat. NCC Buy Floor Paint recommend that this must have dimensions of at least 600mm x 600mm (although current USA standards now propose 900mm x 900mm), for a period of at least 24 hours before removing it and immediately testing the moisture content of the concrete surface beneath it in several places (always take an average of at least 3 results.)
Concrete Floor Moisture Testing Tip: If water droplets are present or if a significantly darker patch has developed when the mat is lifted, then a further waiting period and drying-out is required, -or an alternative floor painting system that can accommodate these conditions is necessary.
Buy Floor Paint can usually arrange to help you test the moisture content of your floor in an appropriate way, by using our own equipment, or by putting you in touch with a local specialist having the right equipment and experience to assist you. Call any of our offices and of our flooring specialists will be pleased to assist you.
5. Concrete Floor and Cement Screed Surface Preparation Methods
When concrete floor surface preparation is required in addition to any surface cleaning, then there now are a number of cost effective modern techniques and types of equipment available to buy or to hire for your own use, plus there are also a number of specialist Floor Preparation Companies and / or Resin Flooring and Floor Painting Contractors who can also carry out this service for you – Including the floor painting works as well, if you would prefer it.Buy Floor Paint have developed a network of these specialists throughout the UK, who have demonstrated this expertise and have the experience to do this work quickly and efficiently – For details of these professional floor preparation, or floor painting contractors that also have this capability, please contact any of our offices and one of our flooring specialists will be pleased to assist you.
Below we have tried to present a summary and introduction to the most commonly used and widely available floor preparation and cleaning methods and equipment in the UK today which include:
5. i. Acid Etching We include and reference acid etching in this guide as it still persists in some areas of the country. However - Please do not use ‘acid etching’ as it is now only proposed by a few people who have yet to update themselves with the latest technologies and advice in regards to the preparation of reinforced concrete floors and cement screeds to receive floor paints, or indeed they have not read the UK Health and Safety Legislation which strongly advises against any form of acid etching on concrete floors, making very stringent limitations and liabilities clear!
All of the UK Paint Manufacturing and Flooring Trade Associations such as FeRFA and the PMA now All clearly state that the 'acid etching of concrete floors is not recommended'’.
This is basically for a combination of health, environment and floor durability reasons, because the concentrated and diluted acids used (normally Hydrochloric/Muriatic or Phosphoric Acids) are all extremely dangerous in transport, handling and application in the home or on site, particularly with the large quantities required to etch a concrete floor. The hazards arise from the risks of potential direct acid contact with the skin and eyes, plus the risk of breathing unknown fumes when it reacts and attacks the concrete surface and any contaminants in or on the surface. These chemical gases will therefore depend on the precise type of ‘dirt or contamination’ on the floor and how it reacts with the acid – Would you like to risk and breathe these?
Additionally, it is almost impossible to adequately reclaim, neutralise and safely dispose of the large volume of liquid residue in accordance with Environmental Control Regulations – It is now strictly illegal to allow any of this waste water to enter the drainage- system (the individuals, the contractor and the facilities management and owner can ALL be charged, heavily fined and made to pay for any and whatever clean-up is required by the Environment Agency and the Local Authority concerned).
Finally with respect to the concrete floor’s durability, the acid will of course also immediately penetrate directly into any cracks or joints in the concrete floor and therefore it will attack the reinforcing bars, steel stanchions or machine base fixings, causing accelerated steel corrosion – The acid will also attack any steel plant or equipment on the floor. Plus to be effective on a floor acid etching requires the concrete to be absolutely saturated with water before the acid’s it’s application, then following the reaction time (very varied), this is followed by multiple rinsing of the surface with clean water to remove the acid and other residues which then significantly extends the floor drying and waiting times. Some of the calcareous and other soluble salts produced in the acid’s reaction with the concrete surface are also inevitably left in the concrete; these acid residues can also subsequently cause osmotic blistering or de-bonding and delamination of floor paints. These subsequent problems can arise even several weeks or many months later and after what may have initially seemed to be a successful job was ‘completed’.
SO PLEASE DO NOT ACID ETCH YOUR FLOORS – it is never worth the risks
– If surface preparation is necessary then it makes sense to use mechanical grinding or vacuum blastcleaning, especially with the extremely efficient and cost effective equipment now available for hire – or you can get a local specialist to do it – We can recommend many competent floor preparation specialist contractors that can prepare your floor, or they will even contract to do the whole job and apply the concrete floor paint on your project – This network of contractors are available for floor painting projects anywhere in the UK.
5. ii. Mechanical Surface Preparation of Concrete Floors: The development in mechanical floor preparation equipment has been considerable over the last 10-20 years, with modern purpose made vacuum blastcleaning, grinding and rotary scabbling machines now widely available. The new machines are fast, precise, controlled and almost totally dust free. Therefore they are also very cost effective on site.
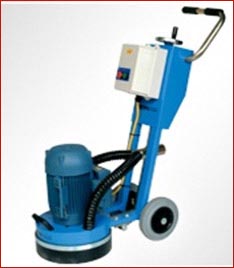 |
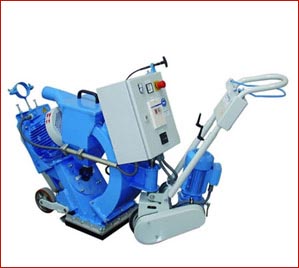 |
| A Typical Small Floor Grinding Machine | A Typical Medium-Size Vacuum Blasting Machine |
Buy Floor Paint can provide you with details on the most appropriate method and equipment to use for your project, together with the names of hire companies that will rent you these machines or, if you prefer, specialist floor preparation contractors that are very experienced in their use, so they can usually do the work for you and even more competitively than you can yourself! Indeed most of the UK’s major resin - flooring and floor painting specialist contractors also now use these companies to do their floor surface preparation work. Therefore it is very often cost effective to get one of our specialist flooring contractors to do the whole job for you and provide a guaranteed floor finish – especially on larger areas over a few hundred square metres.
For more details on floor preparation equipment, floor preparation contractors or resin floor painting contractors near you, please contact any of our offices and our flooring specialists will be pleased to assist you on your specific project.
The following is a brief overview of the different mechanical floor preparation techniques and equipment available for concrete floor surfaces:
5. ii. A. Hand Wire Brushing to Prepare Concrete Floors for Painting
Whilst this is not really ‘mechanical equipment’ and obviously impractical for large industrial or commercial areas, hand wire brushing can be useful, practical and cheap for smaller areas, such as domestic garages or workshops, etc.
The wire brushes should be used wearing good tough gardening / construction gloves (to prevent taking your knuckles off!) and disposable masks (to avoid choking yourself on the dust created!) Work evenly over the surface, removing any soft and friable material – Hand wire brushing will not be suitable for dense, power floated concrete floors as they will not be strong enough and may even only polish the surface. – Stronger mechanical preparation equipment will be required for these surfaces – see below. When the surface has all been uniformly brushed and all of the soft / friable material has been removed, sweep thoroughly and vacuum to remove the residual dust from the surface pores of the concrete.
5. ii. B. Mechanical Grinding to Prepare Concrete Floors for Painting
Mechanical floor grinding machines were the most widely used type of floor preparation equipment, but they lost market this position with the improved development of vacuum blastcleaning machines. The main reasons for this being that the modern vacuum blastcleaning machines have become much more affordable and they are much faster, with greater uniformity of finish. Plus there is also the technical argument that grinding can force dust into the surface pores and therefore this can create an ‘integral debonding agent’ or even ‘polish’ the concrete surface thus greatly reducing subsequent adhesion of the floor paint.
However in recent years floor grinding machine manufacturers have also progressed and developed efficient vacuum floor grinding machines with different sized grinding ‘heads’. Certainly on small to medium sized projects, up to a few hundred square metres, these new grinding machines can also provide an efficient and cost effective solution. Generally wire brush ‘heads’ should be avoided for this purpose as they will actually polish already dense floor surfaces. The abrasive diamond grinding heads are more appropriate for use prior to floor painting.
Good mechanical grinding machinery manufacturers include HTC (Swedish), Asuga (Danish) and Klindex-Chemspec (Italian). We do not currently know any that are still made in the UK, but these machines are widely available.
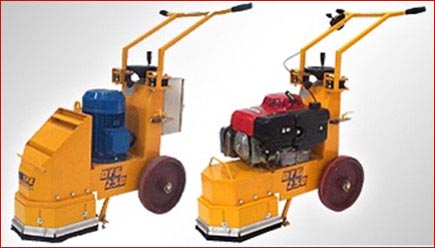 |
 |
| Typical Modern Floor Grinding Machines and their Vacuum Dust Extraction Attachment | |
Important Note: These modern grinding machines are in fact clearly the best equipment to use if:
-the floors to be prepared are wet or damp at the time, because vacuum blastcleaning machines do not work at all well on damp / wet concrete surfaces.
if the floor surfaces are uneven and profiled, then the machines grinding action also increases uniformity and reduces any excessive profiles that would adversely reflect through a floor paint coating,
if there are ‘rubbery’ residues on the floor to be removed, such as old elastomeric coatings, bituminous materials or flexible / elastic adhesive residues - like, those used for some floor tiles or sheet vinyl floors, because vacuum blastcleaning does not remove these materials very well. This is because the impact of the shot is deflected or absorbed by these ‘rubbery’ materials.
Today these modern mechanical floor grinding machines are widely available to hire, or there are specialist floor preparation contractors who can do this work efficiently and effectively for you. As a guide, dependent of the area to prepare, the specific model of machine and grinding heads, the floor condition, access, etc., then up to 1000m² per day can be readily achieved.
If you would like more specific advice on the right mechanical floor grinding equipment for your specific project, then please call any of our offices and one of our flooring specialists will be happy to assist and advise you.
5. ii. C. Vacuum Blastcleaning of Concrete Floors for Floor Painting
The principle of blastcleaning is firing sand, grit or steel shot abrasive at high velocity in a stream of air, at an angle to the concrete surface. The localised impact removes any loose or friable materials and it also locally fractures and very effectively removes any brittle layers, such as cement laitance.
This used to be a very noisy, dirty, dusty and disruptive process, but the development of modern high performance and very efficient machines with integral vacuum collection of the dust and waste, plus the use of recoverable rounded steel shot, means that the process is now very fast, clean, and controllable, plus it is almost dust free.
Due to the partially magnetic recycling process, the abrasive used in these modern machines is always now steel shot.
Small machines are available for hire with a 200-250mm wide enclosed head that can prepare approximately 50m²/hour – these cost around £300 per day or £800 per week, (always get a magnetic roller for around £15/day as well, to recover and recycle more of the shot and therefore save costs on bags of shot that are around £30/25kgs).
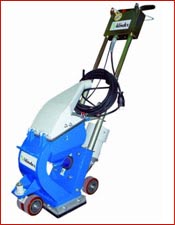 |
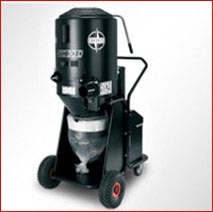 |
| A Typical Small Vacuum Blastcleaning Machine and Dust Extraction Attachment for Concrete Floor Preparation | |
Medium sized vacuum blastcleaning machines capable of preparing around or even over 100m²/hour are available from around £400/day; however these will usually require an industrial 3 phase electrical supply. Large machines, including ride on equipment are also available for very large areas, but these are not available for hire and are only suitable for professional use.
 |
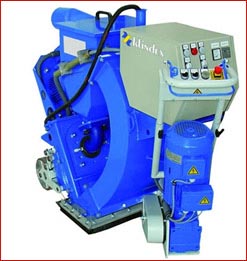 |
| Typical Medium Sized Vacuum Blastcleaning Machines | |
Buy Floor Paint can advise you on the most appropriate vacuum blastcleaning machines and equipment for your project, plus where you can hire them to do the work yourself. Alternatively we can also put you in touch with professional floor preparation contractors that, are very experienced and can therefore carry out your floor preparation works efficiently and cost effectively for you.
6. Repairing Surface Damage, Cracks and Joints before Floor Painting
Prior to applying any type of floor paint, it is always necessary to first repair any visible surface damage or void in the surface, or they will be reflected through and become even more visible in the new painted floor finish.The nature (moving or non-moving) and the cause of any cracks in the floor must also be determined and then they can be treated appropriately to ensure there is no future cracking.
6. i. The Repair of Concrete Defects and Damage Prior to Floor Painting
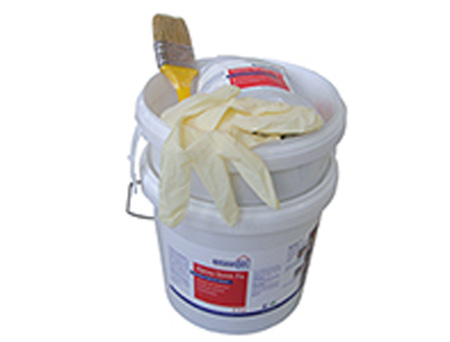 |
 |
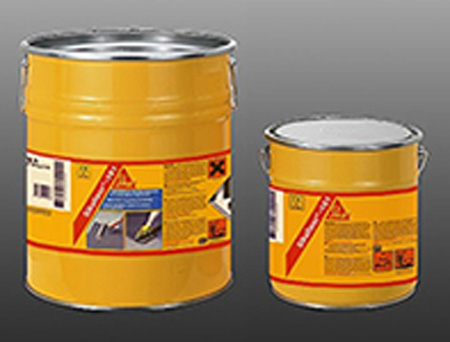 |
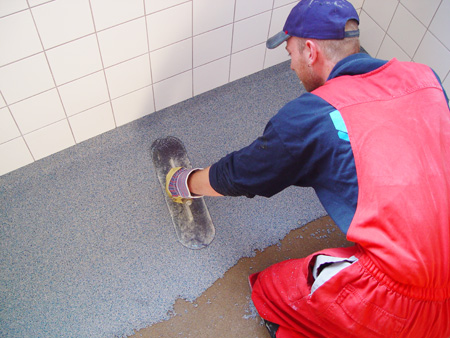 |
| Epoxy Quick Fix - Floor Repair Kit | Epoxy Quick Fix Floor Repair Mortar Mixing |
Sikafloor 161 (AB) 25kg | Epoxy Floor Repairs to Larger Areas |
Floor repairs are sometimes necessary before applying any sort of floor paint, as otherwise any damage or imperfections in the surface will be reflected through and even highlighted by the new floor paint. Floor repairs are also frequently required after damage caused by traffic and other mechanical wear or impact, plus there can be damage due to cracks or the breakdown of floor joint arrises (the joint edges).
Surface damage on concrete and screed floors can therefore be due to many different reasons including defects in the original concreting work, i.e. honeycombing and voids, unsuitable aggregates such as ‘mudstone’, inadequate finishing or poor curing, etc. Or post-construction damage can be caused by impact, wear, abrasion or chemical exposure and attack during service.
The first requirement is always to establish the cause and extent of the damage to assess if it is likely to reoccur, then to mechanically break out and remove any unsound or weak concrete.
The best method of repair will depend on the size and depth of repair required, the floor areas future performance and exposure envisaged, plus the time available, and the ambient conditions at the time the repair has to be made. Basically good repairs can be made with cement based mortars or fast curing epoxy resin based mortars if time is critical. Larger, thicker areas are usually repaired with concrete providing there is sufficient time for it to harden and cure to the acceptable moisture content for the floor paint system selected.
At NCC we can advise on detailed solutions for all types of floor repairs where these are necessary prior to painting the floor.
CAUTION - 'Polyfilla' type materials from DIY Stores and the like are totally unsuitable for pre-floor painting repairs, and all of these materials will only 'pop-out' again to spoil the finish shortly after you have completed your lovely new floor painting job. DO NOT EVER USE THIS TYPE OF FILLER FOR FLOOR REPAIRS.
Sand and cement premixed products, or sand and cement mortars mixed on site can be used, but only when the prepared concrete is thoroughly pre-wetted, and then the finished repairs must also be kept damp, covered and cured correctly - Unfortunately this will also delay the floor painting work by at least a week, and even up to a month or more; in order to allow the concrete to dry out again and be suitable to accept the floor paint. This is because of a combination of technical reasons – the time required for the material to harden, the time for the mortar to reach acceptably low moisture content and the time required for the mortars surface alkalinity to be neutralised by natural atmospheric carbonation.
However in most situations where there is minor damage or voids in the floor, or localised areas of damage in the concrete floor surface, then the best and easiest pre-treatment before painting, is for these to be filled and made good using a fast curing epoxy resin based adhesive mortar. One of the best products to use for this is Sikadur 31 GB Rapid Mortar. This 2-component epoxy resin mortar is easily mixed in the tin, and then applied by trowel or spatula to fill the voids and repair the damage. if there are deeper holes needing thicker layers then the mortar can be extended and made even more cost effective, by the addition of fine kiln dried quartz sand.
Alternatively for slightly larger or deeper areas of damage or arrises to repair, you can use our complete Epoxy Floor Repair Kit, which comes in a single 10kg pail containing the resin and hardener in unique easy to mix packaging, plus the correct amount of aggregate filler, even a pair of gloves (should always be worn to use epoxy materials) and a brush to apply some of the mixed resin as a primer / tack-coat on the surface.
For larger areas of concrete floor surface damage, it is often also cost effective when time and delay / waiting times and repair performance are considered, rather than simply just the materials cost, to use Sikafloor 161 Epoxy Mortar. This is a fast-setting, solvent-free epoxy resin binder, that can be mixed from 1:3 up to 1:6 parts by weight with kiln dried, graded silica or quartz sand. This is then applied by flow or screed application techniques over the damaged areas of the surface by using the edge of a trowel, or with a squeegee blade as appropriate.
The floor painting works can then proceed quickly and without delay the very next day (even later the same day in heated areas).
Buy Floor Paint stock and supply a full range of floor repair products from concrete additives to improve strength, accelerate hardening and reduce the initial water content, prebatched cement and rapid hardening cement based repair mortars, plus a full range of epoxy resin based repair mortars. Therefore whatever damage you have on your floor we can provide detailed recommendation and instructions together with the materials.
For advice and assistance in any aspect of floor repairs, please call any of our offices and one of our flooring specialists will be pleased to help solve your problem. This is because due to the wide extent of different floor repair solutions and techniques required.
6. ii. Crack Repairs in Concrete Floors Prior to Floor Painting
Cracks in concrete floors can be caused by a large number of reasons including initial or long-term concrete shrinkage, building movement or settlement, machine vibration or excessive loading, plus inadequate or incorrect joint design or slab construction. To successfully repair and seal cracks in concrete floors it is always important to understand the exact reason for the crack and if any further movement will occur. This can obviously be a technical issue and so a qualified structural engineer should normally be involved to determine this for any significant cracks or important projects. In new construction projects, it is especially important to do this as early as possible to determine the correct remedial action and the responsibility of course!
Buy Floor Paint can advise you on how best to do this for your project, please call any of our offices and one of our flooring specialists will be pleased to assist you.
• Treating Moving Cracks in Concrete Floors Prior to Floor Painting
If cracks are still likely to be subject to future movement then they should normally be treated as joints. This means that they should be cut square, brought through the floor finish and after the floor painting is complete, they should be sealed with an appropriate floor joint sealant such as Sikaflex PRO 3WP – See the Joints and Joint Edge (Arris) Repairs section below.
• Treating Non-Moving Cracks in Concrete Floors Prior to Floor Painting
In situations where it is the structural engineers’ assessment that a crack is no longer moving, then it can be repaired and sealed prior to applying the selected resin floor paint. The best procedure and materials for doing this obviously depends on the width, depth and length of the crack. It is likely that the surface will need opening by cutting it out to remove any loose or weakened material. Then it can either be filled and surface sealed with a fine epoxy mortar such as Sikadur 31 pressed into the crack, alternatively where advised by the engineer for structural reasons, cracks can be structurally bonded by low or high pressure injection with an epoxy resin injection product such as Sikadur 52.
All of these repair and injection materials, method statements and detailed specifications are available from NCC Buy Floor Paint.
For detailed advice on your specific project please call any of our offices and one of our flooring specialists will be pleased to assist you.
6. iii. Joint and Joint Edge (Arris) Repairs Prior to Floor Painting
Movement joints in new concrete floor slabs should normally be sealed with the appropriate elastic floor joint sealant, with the correct joint movement capability and other performance requirements after the floor finish has been applied.
Existing movement joints in existing concrete floor slabs can be painted up to, or over-coated; dependent on the nature of the existing floor joint sealant, i.e. bitumen sealants can not be painted with resin floor paints.
If joint arrises are broken or the existing sealant has deteriorated or failed completely, then the joints should be cut out and repaired, then resealed after applying the selected floor paint. High strength epoxy resin mortars are the best materials for joint arris repairs, because of the high loads that can be imposed on these edges. The best type of replacement joint sealant is dependent on the type of failed joint sealant, i.e. different sealant types can be incompatible and not bond with the previous sealant residues on the joint sides, which is a particular problem with old bituminous or silicone sealants.
Buy Floor Paint supply a full range of epoxy resin mortars to repair joint arrises, and a full range of floor joint sealants based on all available material types, including the very useful Sikaflex PRO 3WF – a high performance, easily applied, chemically resistant, elastic, single pack, polyurethane resin based floor joint sealant, which is ideal for solving a great many floor jointing problems.
For specific advice on treating the floor joints in your specific project, please call any of our offices and one of our flooring specialists will be pleased to assist you. Photographs can often help us to quickly identify the correct procedure and products to use to and so these can be sent to technical@nccinaction.co.uk, together with a brief summary of the situation and your future requirements for the area.
| Go to top |
For FREE Expert Advice or Assistance Call Any of Our Offices and Our Floor Painting Specialists will be Pleased to Help.
Scotland: 01506 657996
Newcastle: 0191 419 2530
Chorley: 01257 266696
Scotland: 01506 657996
Newcastle: 0191 419 2530
Chorley: 01257 266696
Copyright © 2025 NCC
Site Map